Google Translator

Friday, April 28, 2017

Explosion Boxes for New Baby


I am going to a Gender Reveal party on Saturday for my Nephew and his wife's 2nd baby!  I love these parties since we are all involved in finding out what the sex of the baby will be.  Even the parents don't know at this point since when the sonogram is done- they don't get the news - they have the doctor put the results in a sealed envelope.  They find out the joyful news at the same time everyone at the party does.  It is fun!  I think it's going to be a boy!  I will have to let you know.  Anyway, I have been working on a card for them but it turned into an Explosion Box.  I made one in blue and the other in pink.  I wanted to have all bases covered.


I made the center of the pink box a Merry Go Round.  I was inspired by all the Explosion Boxes I saw on Pinterest.  There are sooo many!  This one is made with one sheet of 12 x 12 paper.  I only have two cross pockets ( to put cards into) that open from the outside for easier access.  If you have it open from the inside you can have 4 cross pockets but once you put something of any height in the middle, it's hard to pull out your cards.  So I made mine pull out from the outside of the box as you can see below.


I have worked on this for a while.  I don't have any horse dies so I looked around and found in my stash little horse stickers - I think they were by Jolee.  I bet I have had them for 5 years but they were perfect.  I used Papertrey Ink's Hexagon Box die for the top of my Merry Go Round and the trim.  It was the perfect size! I cut a straw down to size to hold the horses.  Then it was just finding ideas to add to the box- the shaker window was fun to make!  I love the ribbon on the top of the box with the pearls along the side.  I wanted this box to be very girly!


Below is a picture of the sentiment I used in one of the pockets for both boxes.  It is one I have used before but it is my favorite! 


The theme for the Boy Explosion Box was more Mother Goose than anything else.  Inspired by the Graphic 45 paper I used to decorate the box.  I used Stampin Up's succulent dies ( believe it or not) to make the flower on the top of the box.  Here is the fabulous tutorial by Claire-


The center of my Boy box is a baby's crib!  I used Tim Holtz's bird cage die to make my crib.  I also made a shaker rattle for my Boy box. 


I find it hard to get a good picture since there is so much to look at on this card!  Can you see the little teddy bear who is holding another little teddy bear?  That is a die cut from Sizzix - the little teddy is a sticker that I have had for ages.  I usually don't use stickers but sometimes they do come in handy!  The stickers today are much more detailed than they used to be ! 


Finally, finished the boxes.  I keep adding things I think of to make them just perfect!  Can't wait to find out what the sex will be- I am sure the parents are anxious too!  As I said, it's going to be a boy- wait and see!  Now, back to finishing my birdhouses!


PS:  UPDATE-  OK... I was wrong... it's going to be a girl!  They picked the name Isabelle Mae!  I love it! 

Wednesday, April 19, 2017

Bird House Chandelier


I finished my Birdhouse Chandelier this week!  I found this broken chandelier when we went junk'in the last time- in fact I found 2 chandeliers.  I will show pics of the other at the end of this post.   I spray painted the chandelier after I had taped off the glass section.  Hubby cut the dowels to fit into the arms to make it easier to glue the birdhouses to them.   See the snow bank in the picture below?  We still had one big snow bank - even when the temp was around 70  degrees!  Thankfully, it has finally melted!


The fun part was painting all the bird houses!  I bought them from Joann's but I did sand the birdhouses after I painted them to give them a worn look.  Also, that covered any boo boo's I might have made with the paint.  It was fun trying to match colors to see what would work.  A glue gun worked to attach them to the chandelier.


I had some fun acrylic pieces that I glued to some of the bird houses.  Each house is a little different. 


Now to get hubby to hang it on our front porch! 


I am working on another few birdhouses to put out in the yard.  One BIG birdhouse is going to go to Everett, our grandson!  That is a work in progress- here's a peek-


And I am still working on a different chandelier - but I want to use it as a planter.  I will let you know how it turns out along with more pics of the bird house for Everett!  Have a great day!


Thursday, April 6, 2017

Stampin Up Window Box Tutorial


I decided to do a video with instructions on how I made my Easter Baskets this year.  Now, I haven't done a video in a while.  I had some issues with blurriness and my camera doesn't tape for very long.  As I mentioned, I have ordered a new one!  Yay!  Can't wait to get it!!  But I did learn how to merge one video into another one!  That was fun!  If you want to see more pictures- look at my last post!


I love how the die from the Window Box Thinlets makes the edges of the basket.  Anyway, hope this tutorial helps you to make these cute baskets.  I will have to do some more videos so I can get better at them!  As always, if you have questions- Let me know!

Tuesday, April 4, 2017

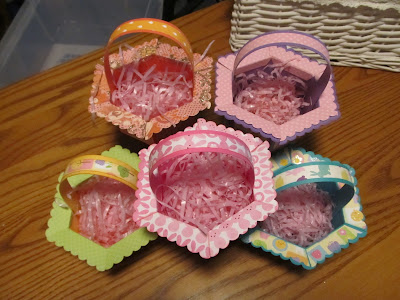
Stampin Up Window Box Easter Baskets


I am loving all the time I have been spending in my studio!  The time just flies by!  The last couple of days I have been working on Easter Baskets.  I used Stampin Up's Window Box die to make the baskets this year.  They are smaller than I usually make but so cute!  Big enough for a bunny and some eggs. 


I had some Easter paper left over from last year that worked perfectly for these baskets.  I used the dies below.  The scalloped die was used to make the rim of the basket that you can see better in the bottom picture.   


These two baskets are my favorite!  I thinks it's all the bunnies on the paper.  Hard to believe Easter is just around the corner.  I see the forecast is for the temperature to go to 60 degrees in a few days.  I can't wait!  I am hoping the snow will melt so we can have an Easter Egg hunt on Easter!  I will keep my fingers crossed!


Sunday, April 2, 2017

Clothespin Fun!


Recently, I purchased the Make It Market Halloween Pin Ups from Papertrey Ink!  They were having a sale!  I couldn't resist.  I think they are the cutest thing!  I will be ready for Halloween!   I made these and attached them to the Clothespins that they provide.  I know you can use them for much more but I love the fact that I can attach these to bags ( they send some of those too) and Pocket Letters and even put a Magnet on the back and put them on your refrigerator.  But it got me thinking about decorating Clothespins.


I had some larger Clothespins that I used Washi tape to give them some color.  I put a magnet on the Chef's clothespin so I could attach it to my refrigerator.  I always have a recipe that I want to try and I can use this to keep it out- so I don't forget!


I love Papertrey Ink's products!  Here are a couple of pictures of the stamps and dies I used.  I put them in a plastic Stampin Up container.  I put the dies on a piece of Magnetic sheet I bought from Joann's that was an 8 1/2 by 11 size by Darice.  You can cut it down to any size  you want. 


We were snowed in yesterday so I had plenty of time to play around with this set!  I am sooo ready for the weather to improve!!  But they are talking about more snow this week.  Save me!!


It is supposed to be warmer so I am praying it will melt!  Hope your day is fun!

Saturday, April 1, 2017

Surprise Party!


Last weekend, my family thru me a surprise retirement party at my sister, Rochelle's house!  Yes, I was surprised!  I thought I was going to a Pampered Chef party!  I had even picked out what I wanted to buy!  I am still surprised that they pulled it off without me even having a clue!  Anyway, it was fun, fun!   I think these cards are appropriate since I though it was a "Chefs" party!  The chef is from My Favorite Things stamps.   I love using my Copic Markers to color him  Of course, I need to practice,  practice.

The inside of the card says it all!   It was such fun seeing everyone! 


The decorations were fabulous too!  Loved the money tree- I mean money flowers!  The banner was priceless! 


I swear it seemed like every corner of the house was decorated!  I really enjoyed seeing family and friends!  I will remember this party for a long time!


  The sayings around the house were funny!  I loved the signs in all the food too.   The food was fabulous!  "The Joy of Retirement is having nothing to do and All day to do it" was my favorite!  Or "What do you call  a person who is happy on Monday- Retired"!


I am getting used to being retired for sure!   Certainly less stress but the sleeping in late and not having to worry about appointments or schedules is a big plus!  I love being able to do what I want with no worries about time.  I worked for 40 years in the banking industry so it is quite a change for me.  One that I am ready to embrace! 


I have all the cards I received from family and friends at the party on display at my  house.  I think I will keep them up for a while!  

Update:  Yup...it's snowing today!   Bummer!